When light rays pass through a very very small aperture, they
spread out in different directions at the edge of aperture-blades.
This phenomenon which results in some blurring or softness in the
produced photograph is called diffraction.
To explain what is diffraction in detail, a separate article is
required. For the time being, let us know that the effects of
diffraction creeps in an image when we use
a very small aperture. Large apertures like f/2, f/2.8 will produce
almost no diffraction.
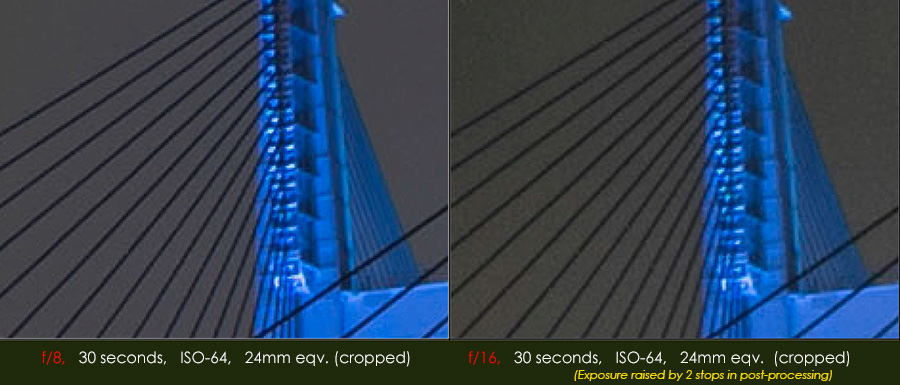
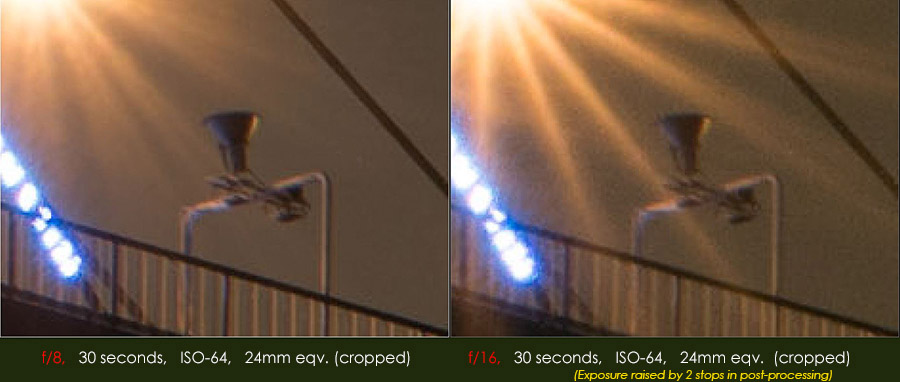
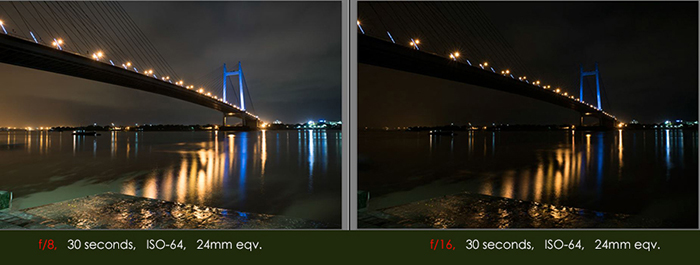
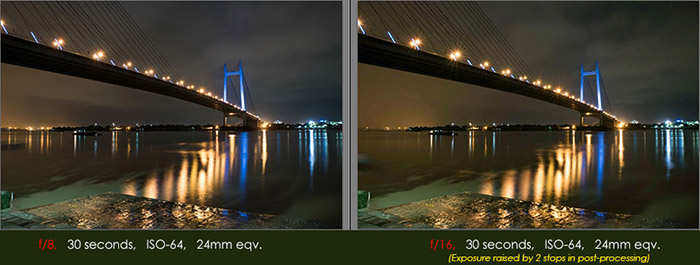
Above two images were taken at f/8 & f/16,
other settings remaining same.
Here are two photographs of the Vidyasagar Setu, Kolkata, India.
Both were taken seconds apart with
30 sec. shutter-speed, iso 64, 24mm eqv.
They differ only in the setting of aperture. One was shot at
f/8, the other at
f/16. The f/8 version shows less diffraction (sharper)
and less starburst, while the f/16 version shows more diffraction (less sharp),
and more starburst.
Diffraction causes loss of sharpness in a photograph. It
is very simple to verify. Set up a tripod, and shoot the
same scenario with apertures f/8, f/16 and f/22. Keep
same focusing point for all the shots and vary shutter-speed
to maintain same brightness level. Now
compare the photographs in 100% resolution. You will find
that at f/22 ... f/32 range, the photographs are
less sharp than those shot at f/8, f/9... The spreading of
light-rays in different directions (due to very small aperture
hole) at the edge of the aperture-blades caused this loss
of sharpness.
High-resolution sensors (where generally pixels are smaller)
are prone to diffraction. For example, cameras having 36mp or higher, are easily
effected by diffraction in comparison to low-resolution cameras (where generally
sensor-pixels are larger).
In the f/16 shot, aperture was stopped down two stops
(from f/8 to f/16), other variables (shutter-speed & iso remaining
unchanged). As a result, the image was under-exposed by two stops
in comparison to the f/8 image. The exposure was equalised
in post-processing by raising two stops.
Please check the following cropped versions of the f/8 and f/16 images.
Above : cropped area of the bridge.
At narrow aperture, sharpness reduces due to diffraction,
light stars are prominent due to starburst effect.
Above : cropped area of the far end. Effects same as above.
Cropped: f/8 and f/16
we find that the f/8 version is sharper than the f/16 version. This is because
diffraction has taken place in the latter due to the narrow aperture f/16.
Again another cropped area from same shots :
Cropped: f/8 and f/16
and same here; observe that the wires in
the f/16 version have lost their sharpness in comparison to the f/8 version.
Why did I shoot the second image when I got proper
exposure with the first one? The answer is at the bottom
of this page.
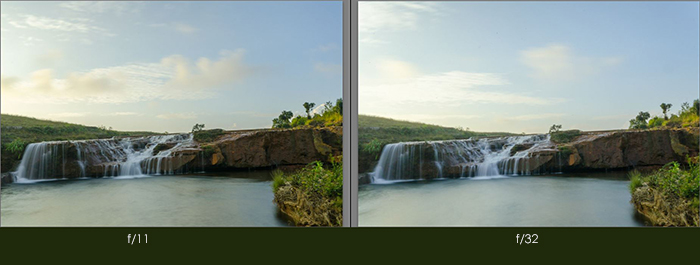
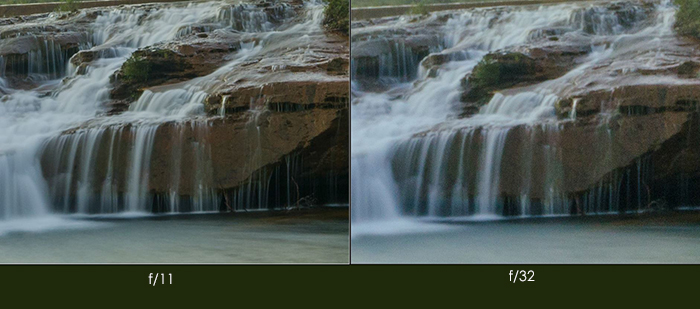
I would like to add another pair of photographs as the
example of diffraction in photography.
left: f/11, right: f/32
left: f/11, right: f/32
The same scenario was shot with tripod within very minimum
period of time (this time with different shutter-speeds).
As usual, the photograph shot at f/11 is sharper than the
one shot with f/32 as seen in both the cropped area.
In a nutshell, we should avoid smallest
apertures to avoid diffraction. But if we widen the aperture, we will be left with less
depth of field
which is not suitable for landscape photography (generally).
To shoot a landscape, seascape, cityscape/architectures, we want everything in
focus, from front to back. So we may have indecision
between the following contradicting facts:
◉ We want maximum depth-of field, so smaller aperture is to be used.
◉ We want no diffraction, so we should avoid smaller apertures.
Sweet-spot of a lens
To find which aperture value of a lens balances maximum depth-of field
and minimum diffraction, some experiments can be done with a particular lens
as follows:
Choose an outdoor scenario to shoot.
It should have elements in the front, middle & far.
Set your tripod in an appropriate place.
Do not move it until you complete the experiment.
Set lens VR/IS/OS (if any) to off position.
Set white balance (may be auto), focal length.
Set aperture to f/4;
Focus properly.
Set shutter-speed and ISO for proper exposure.
Shoot.
Repeat the above with f/5.6, f/8, f/11, f/16 and f/22.
Do not hesitate to use apertures like f/7, f/9, f/10 ...
In your PC, examine the images in 100% zoomed-in.
You will observe that photographs with smaller apertures (f/22, f/20 etc.)
are soft due to diffraction; you may also notice that photographs with
larger apertures (f/4, f/5 etc.) are soft due to less/shallow depth-of field.
They may also be effected by optical aberrations. In photographs with
mid-zone-apertures like f/7, f/8, f/9, f/10 or f/11 etc., you will find the
sharpest image where both diffraction and depth-of field are balanced.
That aperture may be the sweet-spot of your lens.
Note : The above set of photographs are assumed to be of same
focal lengths. For a different focal length, use another set of photographs.
Original
Cropped
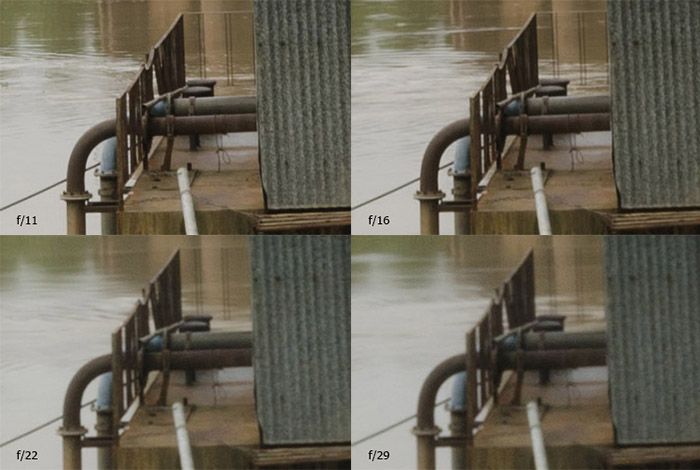
The above four photographs (of same scenario) , were shot with
apertures f/11, f/16, f/22 and f/29. Please observe the diffraction
in small-aperture images.
Effect of Aperture on Starburst/Sunburst
In photography, starburst or sunburst is the effect where we can
record the star-like rays of the Sun, or of any other small and
bright point of light-source. Smaller the aperture, more intense
will be the rays.
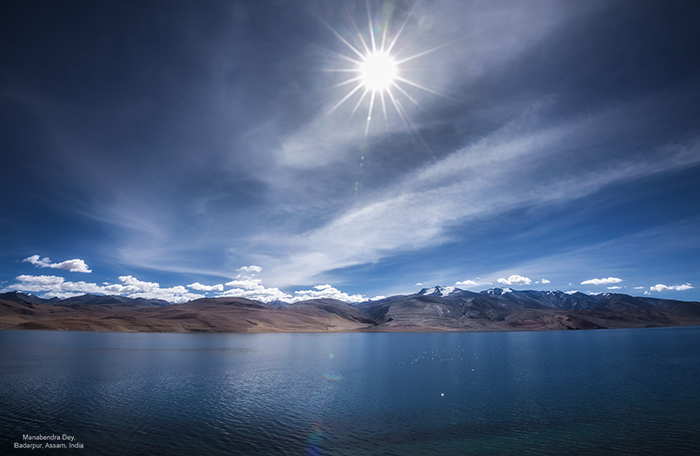
Tso Moriri Lake, Ladakh, India 2018,
Nikon d810, Nikon 16-35mm f/4,
f/22, 1/60 sec., ISO 64, 16mm eqv. Sunburst effect
It is very easy to shoot starburst or sunburst effect by stopping
down the aperture as narrow as possible; but wait, just now we
have come to know the effects of diffraction, so we should choose
an aperture as small as it allows very less or no diffraction.
The number of rays recorded in a starburst effect will depend
upon the lens you are using. Or, more subtly, it will depend
upon the number of aperture-blades in the lens. Higher the number
of blades, higher the number of rays.
Again, if the number of aperture-blades in the lens is even, same
number of rays will be produced. But, if the number of aperture-blades
is odd, number of rays will be produced double the number of blades.
For instance, if number of aperture-blades is 8 or 10 or 12, number
of rays will be 8 or 10 or 12. But if number of aperture-blades is
7 or 9 or 11, number of rays will be 14 or 18 or 22. To explain
the reason behind this is beyond the scope of this article.
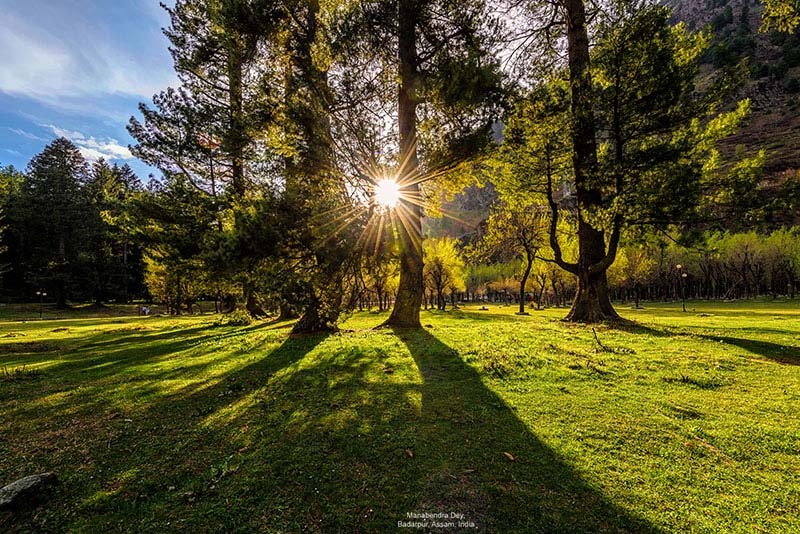
Manali, Himachal Pradesh, India 2016,
Nikon d810, Tamron 24-70mm,
f/22, 1/250 sec., ISO 250, 55mm eqv. Sunburst effect
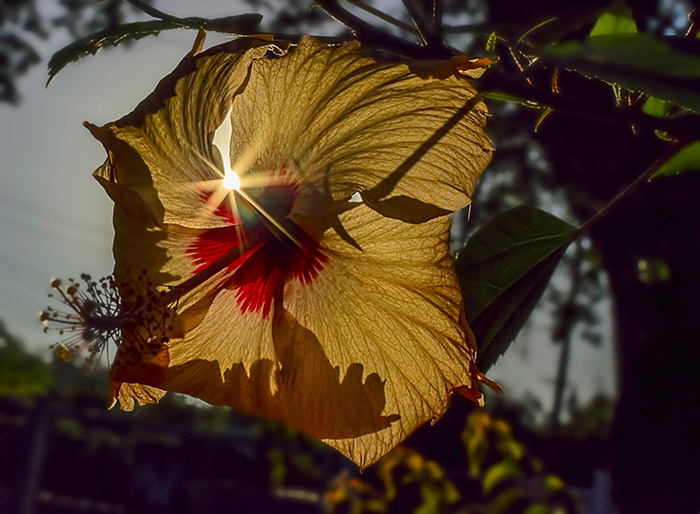
You can also beautify the effect of sunburst effect by partially
blocking the Sun with, say branches, flowers, mountain-edges
etc. as in the above and the following example :
Betab Valley, Pahelgam, J&K, India 2018,
Nikon d810, Nikon 16-35mm,
f/18, 1/25 sec., ISO 160, 16mm eqv. Sunburst effect
Let us again recall the photographs of the Vidyasagar Setu, Kolkata.
A question was raised : "Why did I shoot the second image when I got
proper exposure with the first one?"
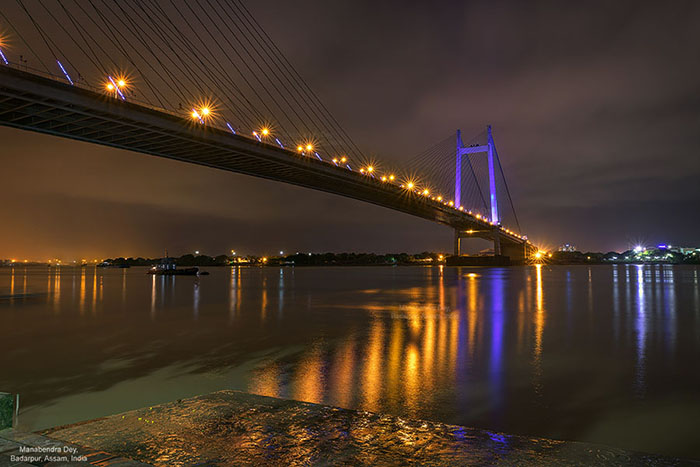
Vidyasagar Setu, Kolkata, West Bengal, India 2015,
Nikon d810, Tamron 24-70mm f/2.8
I used both the shots for the final image. The 2nd image is
underexposed by 2 stops than the 1st one; because f/8 to f/16
is stopping down by 2 stops. So, I raised the exposure of the 2nd
image by 2 stops in post-processing. Now they are more or less same.
Vidyasagar Setu, Kolkata, West Bengal, India 2015,
Nikon d810, Tamron 24-70mm f/2.8
But they are not the same actually. The first image is Ok; but in
the 2nd one, there is starburst effect, which I want to keep, and
diffraction, which I dont want in my image.
Some post-processing is required here. The two images were kept
as layers one upon another, the 2nd image being on the top. Then
a mask was applied to conceal everything of the top layer, except
the light sources on the bridge, which were having starburst effect.
Some re-adjustment of exposure was required. Here is the final image
after some colour adjustment and a little sharpening :
Vidyasagar Setu, Kolkata, West Bengal, India 2015,
Nikon d810, Tamron 24-70mm f/2.8
The final image is actually the f/8 image, except for the light sources
on the bridge, which are being displayed from the f/16 image.
Click here
to check the animation how aperture affects diffraction and starburst in a photograph.